Pages

Showing posts with label makeover. Show all posts

Sunday, July 29, 2012

Makeover: Adding Colour and Contrast in the Kitchen

 I am one of the very fortunate women (who are becoming more and more common, it seems) whose husband loves to cook. And I'm not talking about barbecuing, which James also does exquisitely, but the real gourmet stuff. Don't get me wrong, I can hold my own in the kitchen, but since James cooks most of the dinners, it seemed only right that he have a proper kitchen to do it in. And so the kitchen makeover began.
These photos were taken by the folks at Homes in Motion, who kindly gave me permission to use them here, to advertise our house before we bought it. The door on the back wall opens out onto the back patio, and the one in the opposite corner leads down to the basement. Since we don't have the money to tear out any walls at the moment, the basic structure of the room had to stay the same. 


We love how bright the kitchen is, but hated having the fridge all the way across the room from the stove and sink. For financial reasons the cabinets, counters and floors had to stay (at least for now). Lucky for us, James' parents gave us a generous housewarming gift, so we were able to replace the fridge from 1986 (yup, that was the date on the sticker on the back) and the 27" electric stove with miniature oven. (No turkeys or full size baking sheets would have fit in there, never mind dutch ovens full of lamb roasts, which are not unheard of at our house.)


The other important issue for us was the lack of a dishwasher. We had to have one, not least because I abhor washing dishes, but also because it apparently uses less water to wash dishes in the dishwasher than it does to wash them by hand. (That's a convenient rationalization, isn't it?) Since it had to be installed close to a water source and drain, and we didn't want to lose a cabinet and 4 drawers, we opted for a mini dishwasher that was only 18" wide.

The biggest design challenge was figuring out what to do about our stranded fridge. We didn't want to put the fridge beside the stove, not only because having a heat source right next to the fridge isn't a great idea, but also because we didn't want to block the lovely window that's there. But where else could it go? After a few days of mulling it over, James came up with a brilliant solution. We would seal off the door to the hallway (after all, we already have access to the living room from the kitchen), and get a shallow fridge that would fit in the space between the liquor cabinet and the door to the basement. Eureka! (One of these days I'll post about the experience of hanging a 26" door in a 27" door frame that's not square, but that's a story for another day.) You'd never even know there used to be a doorway there now, would you?


We decided on black for the new appliances, since stainless steel appliances are significantly more expensive, and the ones that just look like stainless still seem to cost more than black. Also, we like black. We think it looks modern, and it's easy to keep clean. In order to unify the look of the kitchen given the black appliances and white cabinets, I had the brilliant idea (is it okay not to be modest? I think it was brilliant!) of replacing the white cabinet handles with black ones. 


In addition to jazzing the place up by adding black accents, we decided that the walls needed a splash of colour too. Along with our bright yellow/orange accent wall (which friends who helped us paint were really not sure about at the time), we opted to paint the bulkhead above the cabinets a lovely dark Georgian brick red that matches our banister.
For storage we used shelves that we already had, selected mostly because they fit the space. We also added a fantastic kitchen island that we found for $250! We love having the extra counter space, and it has a drawer and a shelf for added storage too. Best of all, we fluked out and found a mahogany one with the wood of the base stained in a reddish tint, to match our red accent bulkhead.


One of our favourite features of the kitchen was the built-in liquor cabinet, which you can see between the door to the living room and the door to the hallway. We wanted to highlight it as a special feature, so removed the door and painted the inside of the cabinet dark red. James had to use a screw extractor bit to remove the hinges, but once we had the right tool, the job went smoothly.


When it came time to decorate we were thrilled to discover that the faux-window painting that my mum had created for our kitchen wall in Austin, based on a photo that I took while we were travelling in France, was a perfect match with our new yellow wall colour. It now hangs over our kitchen table (you can see it in the photo, above). With a few more little personal touches, like these great canisters with little yellow flowers that match our yellow wall that James' mom brought for us from her house, the kitchen has really started to feel like home. 


I am amazed and what a difference we have made to this room without changing its fundamental structure in any way. It feels modern, bright and fun, which just goes to show what updated appliances, paint and and the right island can do for a kitchen!


Have you ever made a dramatic change to a room in your home without altering its structure? Perhaps you've changed it's purpose or layout just by swapping out the furniture, and updated it with fresh paint. If you have, we'd love it if you'd share your tips and experiences in the comments!

Wednesday, July 18, 2012

Makeover: From Back Patio to Outdoor Oasis

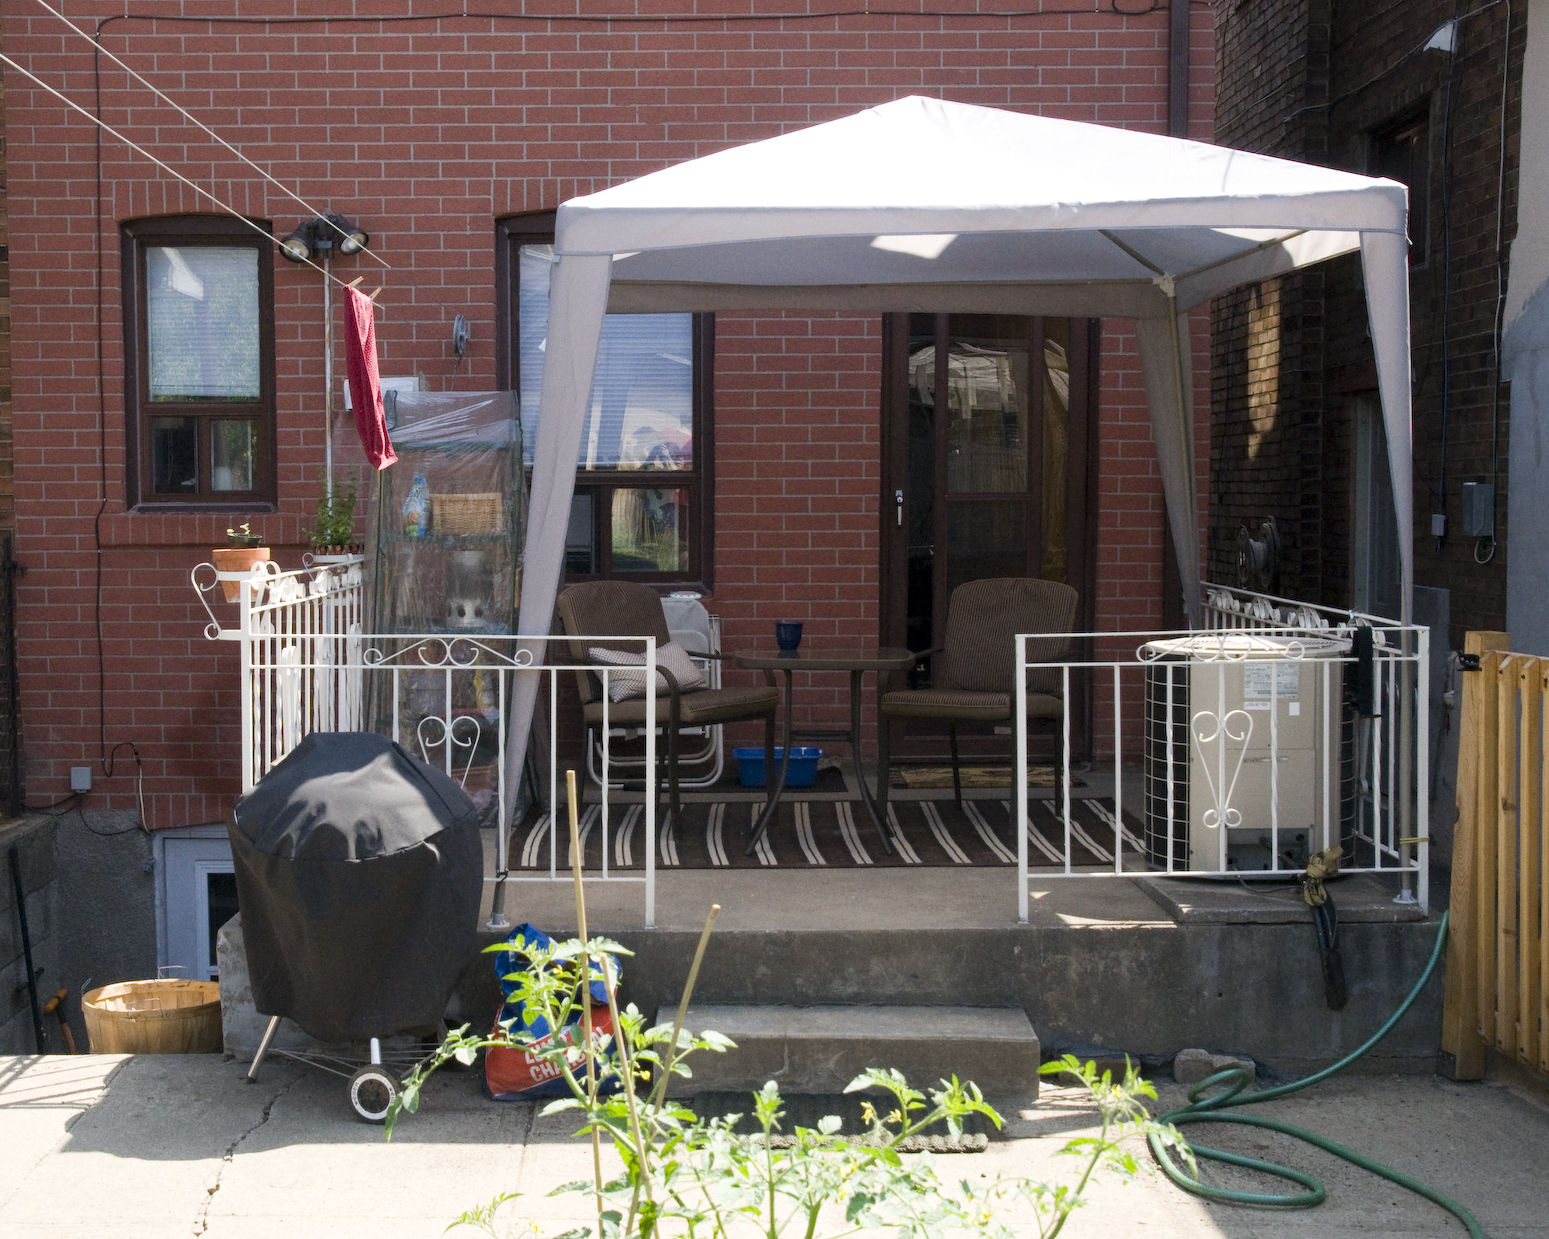
One of the spaces in our home that we have come to use the most since summer has arrived is our back patio, so I wanted to share with you how it came to be so nice and comfortable, since it wasn't that way at all when we moved in. Here is what the back patio looked like when we moved in:

Since then, it has come a very long way. The first addition was the cheap plastic greenhouse that we brought over from our old place. It was a set of poles and shelves with a clear plastic cover that goes over it. I won't recommend it here, since one of the zippers broke almost right away, and it kept falling over (which really isn't good for the plants). In any case, I managed to stabilize it by attaching a 1x2 diagonally across the back, so at least it doesn't fall over any more, and it now provides at least a little covered outdoor shelving for storing gardening and barbecue tools.

Early in the season we picked up a great table and chair set that we love, on sale for only $99. They're metal and really sturdy (although storing them will take up a bit of space in the winter), so we're hoping they'll last a long time. Next, we added a 8' x 8' canopy for shade, which we got at a steep discount because it was discontinued. We picked up a Weber charcoal barbecue and chimney starter (a must-have for any charcoal grill-master, which James is planning to post about soon), and then it was just a matter of adding a few finishing touches.

Our whimsical new door mat!

When James' parents came to visit last week, his mom got us a great outdoor rug for under the table and chairs, and a whimsical bird-themed doormat (above), to help keep the mud from the garden from making it's way onto the kitchen floor. His dad helped us to replace the old outdoor light with a one with a motion sensor for security (and savings, since it won't get left on like the old one sometimes did.) And there you have it, our wonderful outdoor oasis!


Wednesday, May 23, 2012

Makeover: Transforming our Guest Bedroom into a Vacation Hideaway

Welcome to the first post in a (likely to be long) series of room makeover posts. Since the people who owned our house before us were elderly, and had lived in the house for 36 years, I'm sure you can imagine that it needs a little updating. First up, the guest bedroom.


Here is the before picture, taken by the folks at Homes in Motion (used here with kind permission from them) who were hired by the previous owners for the purpose of selling the house. Did you notice the rug? We didn't, until the previous owners removed their furniture and we saw what terrible shape the floor was in underneath it.

As post-home-purchase surprises go, this was not a bad one. The floor was structurally sound and all, it's just that the stick-down vinyl tiles were probably stuck down thirty-odd years ago, and they were all peeling up around the edges. This was a mixed blessing, since although the floor needed to be re-done, the old tiles came off really easily.

Because of this floor our new guest room was in worse shape than any other room, so we decided that (besides painting) replacing the floor had to be our first big project in the new house. And, since I started ripping the tiles off the floor as soon as we had made that decision, there was no looking back.

With the help of a putty knife and some determination, I ripped out the old floor, and my good friends chisel and mini-crow bar (featured here) came in very handy for removing the baseboards (learn how to do that here). I really like doing demolition, and ripping the tiles off the floor was actually incredibly therapeutic. Check out what the room looked like at that point:
As you can see, we had already started spackling the cracks around the window (check out my spackling tips) and painting the trim in the room at this point.

Next up was closet demolition. The closet had built-in shelves that were clearly installed eons ago, and never removed (not even when the room was painted). Each shelf had four legs, and each leg was attached to the shelf with one nail, so the shelves were not very stable. We decided that our best bet was to dismantle the shelves, and hold off on deciding whether to paint and reinstall them, or use the wood for some other project.

There is something great, I think, about getting a peek at the history of a room when you're renovating. In particular, I love to see what colours a room has been painted (or what wall paper has been put up) in the past. Interestingly, it seems like much of our house was, at one time, painted sea foam green (I hope not all at once!). Here's what we saw when we took the built-in shelves out of the closet.

As you can see from the next photo, the painting was well underway at this point. In fact, we had completed one coat on all of the walls. We were originally thinking that we would do all of the painting before we installed the new floor, but before we started on the floor we asked for advice from my Aunt Lori, who has lots of experience installing floors (once word got out that she knew how, it seemed that every friend and neighbour had a new floor just waiting to be installed). She suggested that since it's easy to clean paint off of a laminate floor, and not so easy to touch up the paint if we scuffed the walls in the process of laying down the floor, we should save the second coat of paint until after the floor was finished. (You can read about laying the floor here, here and here - it was a big job!) Here is a photo of the new floor in the process of being laid down.

Once the floor was laid, it was time to put the baseboards back on. But we just couldn't do it. The rest of the room was so beautiful and clean and new looking, and the baseboards were encrusted with yellowing varnish, and dripped with paint from years gone by. So we embarked on the very time-consuming task of sanding down the baseboards. (Well, we did cheat a little and paint the baseboards in the closet, since it hardly seemed worth the effort to sand those ones.)

Once we got started, there was no going back, so we were very glad to discover that under all that yucky varnish the baseboards were made of beautiful oak! We decided to invest $30 in a power sander, which made the job go a lot more quickly, and before long we had sanded, oiled (use mineral oil from the pharmacy) and replaced our beautiful new baseboards.

Then we installed a new pole (rod?) in the closet to hang clothes from (post about how to do that to follow), and a shelf above it. We used two cup hooks and an old curtain rod we had hanging around to hang the curtains. Incidentally, I made these curtains for James' bedroom in his apartment in Austin way back when we were first dating, and thanks to my grandmother Gloria's wise counsel, I never get rid of curtains. 

As for the furniture, we put in a double bed, instead of the single bed that you see in the "Before" photo, but I still think that the room looks bigger now. We're still on the lookout for an inexpensive (or free?) bed frame for it. 


We found the bookshelf on the side of the road (and it's in great shape!). I re-painted the little white bedside table, which sat beside my bed at my parents' house for as long as I can remember (and may have been in my aunt or my mum's childhood room before that). The mirror in the guest room also came from my childhood room, and my mother painted the painting that's hanging above the head of the bed.


And there you have it, our brand new guest room, which we now out to tourists and business travellers through AirBnB. It's very quiet because it overlooks the back yard, and comes with a lovely view of the garden.

If you went on vacation to another city, would you like to stay in a room like this? Would you mind having a dog like Asta around? What do you do to feel more at home when you're travelling?